Monday 26 August 2013

How to add a widget to the header in blogger

Add a widget to header-techpro365


Many blogger templates will have a feature that allows you to add an extra widget to the header section. The single column structure templates will not have this feature.

In this tutorial I will tell you ‘How to add a widget to the header section’ in blogger.
We have to make some simple changes to the template. Don’t worry; I will help you through this. Before making any changes “please backup your template”.

Follow these steps:
  1. Log in to blogger dashboard.
  2. Go to template. Click “Backup/Restore”. Click “Download full template”.
  3. After downloading your template, click “Edit HTML”.
  4. Search /*Header or /*-----Header (something like this).
  5. Now below it add this piece of code.
  6. Find <b:section class=’header’ id=’header’ maxwidgets=’1’>  and replace it with 
  7. Now search for </header> and add the below code before the header.
  8. Find ]]></b:skin> and before it add the following CSS code.
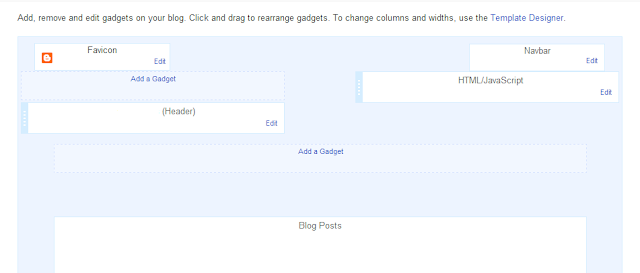
  9. Now save your template and see the layout of your template, you will find an ‘Add a Gadget’ box to the right of your header.
  10. You can make changes to the font-size, width, float and other parameters according to your template.
If you have any genuine problems regarding this post please feel free to contact.
Print Page

Wednesday 17 July 2013

How to add Facebook popup like box for blogger

Facebook popup

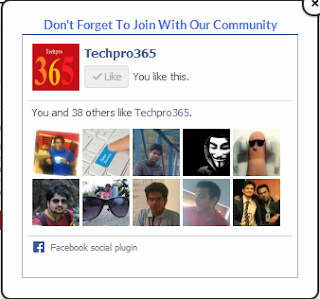
Hi! Guys in today’s post I would like to tell you ‘How to add Facebook popup like box for blogger’. After the page is fully loaded the Facebook popup like box slides from the bottom of the page to the center.

Adding this widget to your blog is very simple.


Follow these simple steps:

  1. Log in to blogger and go to Layout.
  2. Click on “Add a Gadget” and select HTML/Javascript.
  3. Copy the below code and save it.
 Before adding the code, please change Techpro365 with your Facebook fan page.

 You can also change the “Don’t forget to join with our community” to whatever you feel   like adding.

CODE:

<style type='text/css'>
#Techpro365FBpop {
position:fixed !important;
position:absolute;
top:350px;
left:50%;
margin:0px 0px 0px -182px;
width:300px;
height:auto;
padding:16px;
background: #FEFEFE;font:normal Dosis, Georgia, Serif;
color:#111;
border:2px solid #333;
-webkit-box-shadow:0px 1px 2px rgba(0,0,0,0.4);
-moz-box-shadow:0px 1px 2px rgba(0,0,0,0.4);
box-shadow:0px 1px 2px rgba(0,0,0,0.4);
-webkit-border-radius:10px;
-moz-border-radius:10px;
border-radius:10px;
}
#Techpro365FBpop a.bsclose {
position:absolute;
top:-10px;
right:-10px;
background:#fff;
font:bold 16px Arial, Sans-Serif;
text-decoration:none;
line-height:22px;
width:22px;
text-align:center;
color:#000000;
border:2px solid #333;
-webkit-box-shadow:0px 1px 2px rgba(0,0,0,0.4);
-moz-box-shadow:0px 1px 2px rgba(0,0,0,0.4);
box-shadow:0px 1px 2px rgba(0,0,0,0.4);
-webkit-border-radius:22px;
-moz-border-radius:22px;
border-radius:25px;
cursor:pointer;
}
</style>
 <script type="text/javascript" src="http://ajax.googleapis.com/ajax/libs/jquery/1.4.1/jquery.min.js"></script>
<script type='text/javascript'>
$(window).bind("load", function() {
// Animate Top
$('#Techpro365FBpop').animate({top:"180px"}, 1000);
// Widget by www.Techpro365.com
$('a.bsclose').click(function() {
$(this).parent().fadeOut();
return false;
});
});
</script>
<div id='Techpro365FBpop'>
<!-- Widget by www.Techpro365.com Start -->
<center><b><a class="Techpro365">Don't Forget To Join With Our Community</a></b></center>
<center>
<iframe src="//www.facebook.com/plugins/likebox.php?href=https%3A%2F%2Fwww.facebook.com%2FTechpro365&amp;width=292&amp;height=258&amp;show_faces=true&amp;colorscheme=light&amp;stream=false&amp;show_border=true&amp;header=false" scrolling="no" frameborder="0" style="border:none; overflow:hidden; width:292px; height:258px;" allowtransparency="true"></iframe></center>
<!-- Widget by www.Techpro365.com End -->
<a class='bsclose' href='#'>&times;</a>
<center style="float:right; margin-right:10px;">
</center></div>

If you have any genuine problems regarding this post please feel free to contact. 

Print Page

Wednesday 19 June 2013

How to add a floating or fixed header to blogger.

floating-header

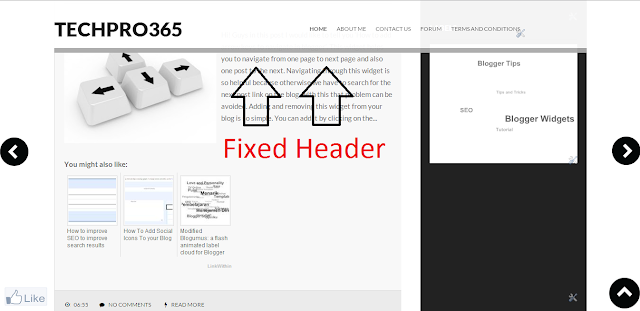
Hi! Guys in this post I would like to tell you about ‘How to add a floating or fixed header to blogger.’

The header portion remains fixed while you scroll down the page of your blog. This can be done by making some changes to the style sheet of the template. Don’t worry I am with you throughout this.

But before making any changes to your template please backup it.

Now follow these simple steps:

  1. Log in to blogger.
  2. Go to template and backup it first.
  3. Click on ‘Edit HTML’.
  4. Now search for #header or header#masthead or something like this that defines the header portion of the template. You can do the search by pressing Ctrl+F.
  5. Add position:fixed; z-index:200; background-color: #fff; to the #header portion of style sheet.
  6. This part of the code makes the header portion to stick at the top of the blog and any other content.
  7. Now we have to make some changes in the #main portion to prevent the posts from being positioned underneath the header.
  8. Search for #main or the portion that defines the main portion of the blog.
  9. Add margin-top:200px; to the #main portion of the style sheet.
  10. Sometimes you have to make some modifications in the style sheet according to your needs.


If you have any genuine problems regarding this post please feel free to contact.

Print Page

How to add arrow keys to navigate in blogger


Hi! Guys in this post I would like to tell you ‘How to add arrow keys to navigate in blogger’.

This widget helps you to navigate from one page to next page and also one post to the next. Navigating through this widget is so helpful because otherwise we have to search for the next post link on the blog, with this that problem can be avoided.


Adding and removing this widget from your blog is so simple. You can add it by clicking on the ‘Add to Blogger’ button.


How to let others know of this?

You can do it by adding some floating images like I done it on this blog. You can let them know by showing some text on your blog.

If you want to show some floating images follow these simple steps.

Log in to blogger.

Go to template. At first backup your template and click on edit HTML.

Search for ]]></b:skin> . You can do this by pressing Ctrl+F.


Add this below code just before ]]></b:skin>.


Now search for </body> and add the below code just before </body>.


Now click on ‘save’ button and you can see the changes on your blog.

You can edit the image links of the navigation keys in the above code.

If you have any genuine problem regarding this post please feel free to contact.

Print Page

Tuesday 21 May 2013

How to add Floating Social Share bar


Hi guys! In this post I would like to tell you ‘How to add Floating Social Share bar’.

Generally bloggers use social networking sites to promote their content and get visibility. With this widget we can easily access different kind of social networking platforms at one place.

Adding this to your blog is so simple that it takes barely two minutes to do so.

Follow these simple steps:

  1. Log in to blogger and go to Layout.
  2. Click on Add a Gadget and select HTML/JavaScript and paste the following code and save it.
  3. Before saving it change the techpro4u with your twitter account name.
  4. You can customize this widget according to your convenience.
  5. By default the position of the widget is left if you want to change it to right change left to right.
  6. Check out your blog for the changes.

CODE:

<!-- Sidebar share buttons techpro365.blogspot.in--><style type="text/css"> #pageshare {position:fixed; bottom:5%; margin-left:-780px; float:left; border-radius:5px;-moz-border-radius:5px;-webkit-border-radius:5px;background-color: #b2e0ff;padding:0 0 2px 0;z-index:10;} #pageshare .sbutton {float:left;clear:both;margin:5px 5px 0 5px;} .fb_share_count_top {width:48px !important;} .fb_share_count_top, .fb_share_count_inner {-moz-border-radius:3px;-webkit-border-radius:3px;} .FBConnectButton_Small, .FBConnectButton_RTL_Small {width:49px !important; -moz-border-radius:3px;/*bs-fsmsb*/-webkit-border-radius:3px;} .FBConnectButton_Small .FBConnectButton_Text {padding:2px 2px 3px !important;-moz-border-radius:3px;-webkit-border-radius:3px;font-size:8px;} </style> <div id='pageshare' title="Get this from techpro365.blogspot.in">
<div style="margin-left:8px;"><div class='sbutton' id='like' style='margin: 5px 0 0 5px;'><script src='http://connect.facebook.net/en_US/all.js#xfbml=1'></script><fb:like layout='box_count' show_faces='false'></fb:like> </div></div>
<br /><div class='sbutton'><a class='twitter-share-button' data-count='vertical' data-via='techpro4u' expr:data-counturl='data:blog.url' href='http://twitter.com/share' rel='nofollow'>Tweet</a><script src='http://platform.twitter.com/widgets.js'; type='text/javascript'></script>
<br /><div class='sbutton' id='gplusone'> <script type="text/javascript" src="https://apis.google.com/js/plusone.js"></script> <g:plusone size="tall"></g:plusone></div><br/><div class='sbutton' id='su'> <script src="http://www.stumbleupon.com/hostedbadge.php?s=5"></script> </div> <div class='sbutton' id='digg' style='margin-left:3px;width:48px'> <script src='http://widgets.digg.com/buttons.js' type='text/javascript'></script> <a class="DiggThisButton DiggMedium"></a> </div> <div style="clear: both;font-size: 9px;text-align:center;">
<a href="http://techpro365.blogspot.in/" target="blank"><font color="red">Get This<font></font></font></a></div><!-- Sidebar share buttons End --></div></div>


 If you have any genuine queries or facing any difficulties in following the post feel free to ask through the forum or the contact page.


Print Page

Monday 20 May 2013

How to add 'Wibiya toolbar' to blogger.


HI guys! Today in this post I am going to tell you ‘How to add Wibiya toolbar to blogger’.

What is Wibiya toolbar ?

Wibiya toolbar is a customizable, free and attractive toolbar which allow users to share or promote your content mainly through the social networking sites. The main feature of this toolbar is that the user has no need to navigate away from the site.

Adding this toolbar to your blog or website is very easy. Just follow these simple steps.

  1. Go to Wibiya click on get it now.
  2. Fill in the form details.
  3. Now you will see a screen that looks like this.


  4. Log in to your blogger account.
  5. Follow the instructions on wibiya website.
  6. Click on “Add Widget” at the bottom of the directed page.


  7. Now check your blog for the attractive wibiya toolbar at the bottom of the page.

Print Page

Friday 17 May 2013

How to customize themes of comment box in blogger


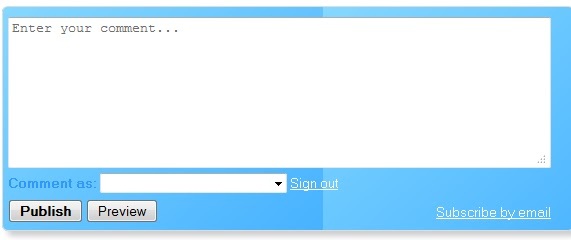
Hi! Guys many of us got bored using the simple theme in the comment-box in blogger. Can we change the theme? Of course yes!

In this post I will tell you how to change the comment box theme.

Follow these simple steps:

  1. Log in to blogger.
  2. Go to template, click on Edit Html.
  3. Now find this code]]></b:skin> and paste the below given code before it. You can do it by using Ctrl+F. Also find <div class='comment-form'> and replace class with id.
CODE:


You can change the background URL with the image URL you like from the images given below. You can also change the color:#0ab00a, Arial and other attributes of your choice.


If you have any genuine doubts about changing the comment-box template, please feel free to contact.

Print Page

Monday 6 May 2013

How to add 'Facebook-Twitter-Google+' follower box


Today in this post I would like to take you through the process of “Adding a useful followers widget”. As you guys already know about a ‘follow box’. In this widget we have three in one follow box facility for Facebook , Twitter and Google+. This is a cool widget which shows all your followers at one place. Adding this widget to your blog is very easy.

Follow these steps to add this widget to your blog:

1. Login into your blog and go to Layout.
2. Click on ‘Add a Gadget’.
3. Copy and paste the below given code and click on ‘save’.
4.  Now open your blog and you can view the widget working.


Before adding the code to your blog, please paste it in notepad and make these changes:

1. Change ‘Techpro365’ to your blog’s fan page.
2. Change ‘techpro4u’ to your twitter.
3. Change the google+ id ‘106197391344352891445’ with yours.

CODE:


If you have any genuine queries about this post or facing any problem feel free to ask by posting in the comment box.


Print Page

Saturday 6 April 2013

How to add 'Facebook like and send buttons' for blogger.


Hello! You are here because you searched for ‘How to add 'Facebook like and send box' for blogger.’ Facebook has come up with a new set of social plugins which enable you to provide engaging social experiences to your users with just a line of HTML. The Facebook Like Button is One of them. Facebook like button will allow your readers to quickly share your posts with their Facebook Friends. You can also get to know how many people liked your Blog Post .This process includes adding a small code to your blogger template. So, before going any further please backup your template.
  
Now Login to your Blogger Account and go to Design > Edit HTML and click on the check box which says “Expand Widget Templates”.

Your template should have the specification for the fb tag that you have used. The following namespace declaration will take care of that. To declare the namespace, find “<html” and change it to <html xmlns:fb="https://www.facebook.com/2008/fbml". This is necessary for all FBML widgets using the fb tag.  So if you have already added the namespace while adding some other FB plugin, then you can skip this.

Search for “<data:post.body/>”. You may find this by pressing “Ctrl+F” buttons and type it in the search box.

Now copy the code and place it just before <data:post.body/>
 CODE:


Now save your template and you will find these buttons in every post of your blog.

Print Page

Saturday 16 March 2013

How to remove 'comments box' from static page on blogger

Many bloggers face the problem of removing the ‘comments box’ from static pages on blogger. This can be done by using the page settings at the right side of the editor.
Click on ‘page settings’--> ‘options’ and select the ‘Don’t allow,hide existing’ radio button and click on ‘Done’ and update it and you are done.

page settings for static pages in blogger


Print Page

How to create an excellent 'About me' page for blogger


When it comes to putting together a powerful website or blog, every page is important. Yet many people seem to overlook the most important pages like “About me” page, and thereby commit a big mistake.
If you are here means you are so lucky that you are not committing that mistake that many others are doing. It is so true that many people want to know about you and your ability to solve their problem. If you are not sure of how to make “About me” page don’t get tensed as I will explain about some important elements of this page.
What is an “About me” page?
An about page of a website or a blog contains some important information about your Website/Service or organization. This single page speaks about Who you are, what you can do and why this website. This is a place where you talk about you and show your achievement and strong points. Of all the elements of a website, “About us” or “About me” page is one of the most important elements.
Some of the elements you should keep in mind before making an “About me” page are:
Maintain Human Touch:
Always remember it’s a point of connection between your readers and you. So, you might like to maintain the human touch, add some funny comments and also maintain the professionalism at the same time. You can start with your blog foundation, vision, what do you do, and what action they can take next.
Keep it Focused:

The main reason people will visit your “About Me” page is to find out more about who you are, and why you are the right person to solve their problem. You don’t need to write an autobiography to achieve this.

Make this page short and sweet by giving the people a little background about yourself, your qualifications and your expertise in an engaging manner.
Never ever lie to your readers:
Many people make the biggest mistake of bragging about them to make their page or biography look good. But, remember a bad reputation spreads like light! So, never lie to your readers and tell them frankly about yourself and your skills and achievements.
Keep your personal stuff aside:
This page should be more professional rather than personal. Keep your personal stuff like your hobbies, things you like etc.., away from this page. They should be presented in your social networking profile. Add a picture of yourself; tell them about your educational background and the reason behind to start this blog or website.
Think from a reader perspective:
You should think from a reader perspective view more than an author’s. You should think about what they are expecting from you. Sometimes they might be interested in connecting to you through social networking. So, give them the links of your personal profile and fan pages if any.
I think you are now ready to make your own “About me” page. Please feel free to let me know if I had missed any important aspect through the comment box below.

Thursday 28 February 2013

5 Mistakes to avoid while using and starting a blog


A good number of people are interested in starting a new blog in this highly developing internet era. Some of them had taken it as a hobby while some as a daily profession. However as we know that nothing is easy, it also is applicable for blogging. Plan before you act as there are many things that you cannot modify or change when once done. A number of essential parameters are there that are to be considered before starting a new blog while some of them are discussed here in this post. Many new bloggers end up in taking those steps that are to be avoided while blogging. So, here in this post I would like to point out those aspects which are to be avoided preferably.

Let’s have a look at some of the commonly committed mistakes while starting a new blog:

Settle Down for the Best Niche and Stick to it!

The first thing you need to keep in mind in order to become a successful blogger is to settle down for the best niche. Most of the time new bloggers take up random topics and start to blog on those random topics. This approach usually fails to create an impact in the blogging field and make them to quit blogging. Do some research on the niche before taking up the task of blogging as it is one of the major aspects in the process of blogging. So, make sure that you settle down for the right and best niche.

Don’t Start a Blog Merely for Money

There are a number of new bloggers who start a blog for earning some quick money. However they are not successful in either getting money or getting the considerable amount of traffic. Stick to the topic and provide a good, useful and interesting content to attract more number of visitors and thereby earning money through monetising your blog. It is always advisable to concentrate more on the content and other aspects related to it rather than thinking in earning point of view. Your earnings start easily if you have considerable amount of daily traffic.

Say ‘No’ to Plagiarism

Plagiarism means copying the content from other blogs and websites and posting it on your blog. In simple words the using of Ctrl+C and Ctrl+V combinations. Some of the new bloggers who usually don’t want to put in some hard work in research about a particular problem or topic follow these shortcut ways. During the starting days it will be easy but as the time goes on they face the difficulties in that shortcut path. The quality of the content is the main root of the blog. So, don’t opt for any shortcut ways for the blog content. Do some research before posting something on your blog and your aim should be is to generate good quality original content.

Don’t fall for Showy or Garish Blog Designs

One of the major mistakes bloggers generally commit is to fall for showy template designs. Most of the times they tend to use fancy and colourful templates. However these templates lack the official look. Many readers may find it difficult to read your posts and may also miss the important content and complain about the appearance of your blog. So it is always advisable to stick with a highly professional and simple light kind of template. It may increase the chance of getting more number of return visitors.

Avoid Complex Categorizing and Tagging

Categories and tags usually refer to the table of contents of your blog. They help the visitors or readers to find the content needed to them with ease. This is another aspect in which most of the new bloggers tend to make mistakes in.

The problem with them is that they fail to understand the mere purpose of categories and tags is to simplify your blog visitor’s visit to your blog. They try to use the maximum number of keywords related to the post that may result in a huge number of tags which is so confusing. 

Many a time in the process of keeping things organized, new bloggers forget to take into consideration this parameter, which is exactly why categories and tags come out to be of no use to them. This is why you need to be very careful while choosing categories and tags. Maintain balance while using these parameters. You must plan categories well in advance as they need to possess a meaning. On the other hand the tags that you need must be based on the keywords that are likely to be searched by the visitors.

So, if you are starting a new blog try to avoid these aspects. If you already started blogging stick with your niche and avoid making mistakes like changing the theme or posting something that is not related to your niche or the theme.

If you think there are also other aspects that are need to be discussed but are left, please feel free to let me know by posting in the comment section below. I wish you all the best and for a grand success in the field of blogging.


Print Page

Tuesday 26 February 2013

Submit your site to Search engines like Google and Bing.


The first step to getting your site online and to get better rankings in Google is to submit your URL to search engines. An example of an URL is www.blogger.com. Eventually the search engines will find your site but this will help expedite the process.
Once you submit your URL, it could take several days, weeks, or months for the search engines to index your page(s). Results may vary so don’t write this in stone. Factors such as other websites pointing to your site can affect this time as well.
Submitting to Google:
 1. Go to the following link: http://www.google.com/addurl/?continue=/addurl
2. Type in your URL, example: http://www.yoursite.com
3. Enter comments about your site. This is optional. Usually I enter the genre of the site and a few keywords. Example: Blogger tips and tricks.
4. Enter the captcha text shown in the box
5. Select “Add URL”
 Submitting to Bing:
 1. Go to the following link: http://www.bing.com/docs/submit.aspx
2. Enter the captcha text shown in the box
3. Type in your URL, example: http://www.yoursite.com
4. Select “Submit URL”
 Ask does not have an URL submit feature. Until recently, you could submit your sitemap to them. But Ask.com has now retired this feature and says they will be crawling sites instead. So, the next best thing is to add a directive in your robots.txt file that specifies auto-discovery of the XML sitemap.Like this:SITEMAP: http://www.the URL of your sitemap here.xml. The sitemap location should be the full sitemap URL.
That’s it! Once you complete the above steps, just sit back and be patient. It takes time for the search engines to index your pages. If you submit more than once, some search engines may consider this spamming which could result in not indexing your site at all.